The State of Our Litigious Society

She MIGHT break her armI read a quick piece in our free, local paper yesterday that a school district in Cabell County in western West Virginia is removing all swing sets from their playgrounds for safety reasons; more accurately, to avoid further lawsuits from litigious parents who see dollar signs when their kids are being kids as they have been for millenia.

Some daredevil young soul decided to do a “Superman jump” off the swing and broke his arm and his parents sued and won a judgment of $20,000 against the district. I ask you this:

As a kid, did you ever perform a Superman jump off the swingset, see who could go highest while jumping, or see if you could go all of the way around the set and got a blood blister from the chains as the slack went away and pinched your fleshy hands?

Yes! Every boy who has a decent set of kahonies has done one or all of these stunts on a swing set.

The difference is that in the 1950s through the early 1990s parents knew innately that “kids will be kids” and some of them have fragile bones and would break them playing on the playground. We always had a kid in a cast somewhere in the 2-3 grades surrounding mine. I broke my nose jumping onto a raft in our pool when I was about 7 years old. Did my parents sue the pool manufacturer, raft manufacturer, or God for creating water that is denser than air?

NO! That would have been laughed out of court in 1988, just as this should have in 2010.

Has every lawyer and judge in this country lost sight of the fact that breaking arms and legs is part of growing up? I would dare say so.

Second item, and this is purely judgmental based on where the lawsuit came from: maybe if the kids parents had a job and weren’t on food stamps, they wouldn’t have needed $20k, because that sure isn’t much money after the lawyer takes his cut. All they succeeded in is making their kid a weenie (he’ll realize it by the time he’s 40) and ruining the fun of all of the other kids in the school district.

This ranks up there with the coffee lawsuits against McDonalds 1n 1994 and a recent one this year against Starbucks after SHE spilled the tea on her son. Amazingly, the Starbucks lawsuit had over a decade of warnings printed on coffee and tea cups as a result of the McDonald’s lawsuit to warn those who should wear helmets to protect their precious few brain cells that the drink they have just been served hot is, indeed, HOT!

Let’s work on personal responsibility, people.

Photo of the Week #1

Relax...

6 Killer Marriage Tips

YouTube Preview Image

Using ImageWell for Blogging

ImageWell, as openedIf you’ve got a Mac, you’re in for a treat. I’m going to share with you the best tool in my arsenal for adjusting images from a camera or from iStockphoto (they have a free image of the week that is usually 5-12MB in size): ImageWell. For only $20, you get every basic feature for editing an image for your blog that you could possibly need, plus a bunch of easy-access and easy-save features that will knock your socks off if you live in a climate that wears socks.

Starting With the Basics

Your blog obviously has a width set for the content area, and for most sites, this is between 450 and 650 pixels (px) wide. This site, as it is at this moment is using a 640px content area, so I have several WordPress media settings set to create appropriate thumbnail and full-width sizes of my images based on that width. Many of us use a lightbox plugin that enlarges the image when it’s clicked, so the maximum size you want that to go is the size of a laptop screen for those on the go, limiting the largest image you need to be 900px wide or 600px high, whichever is comes first. It does you no good to have a 100px tall image that is 1800px wide on a 13″ laptop. So, what are you supposed to do if you have an image that is too big?

Enter, ImageWell

I discovered this about a week after I got my first Mac: a 6 yr-old, 12″ MacBook running OS X 10.4, rather poorly. I got it used and it clearly needed a lightweight program for image editing rather than trying to run Photoshop Elements on it. Looking at the capture above, you can see how simple the window is, and that’s about it, but it’s so powerful in little ways.

  • Dialog box
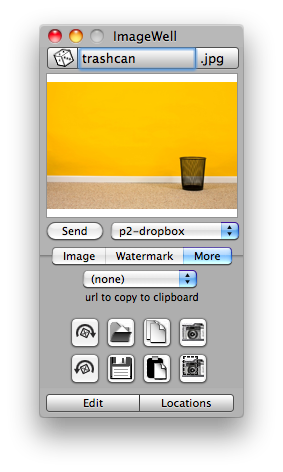
You can open images nearly too many ways. There is the drag and drop method of dragging a file from Finder to either the ImageWell icon in the Dock or to the image area of the program itself. You can also Control-click the image area to bring up a dialog box with even more options that make Windows users jealous.
  • You can change the image dimensions, compression, file name, file type, save location, watermarks, and orientation all from the main window. This makes for very rapid image processing, especially when you’re creating a gallery. The screenshot of a gallery of our vacation photos here were all later re-sized (and watermarked) using the method described below in just a couple of minutes.

A gallery with watermarks

Steps for Resizing

  1. Get the image into ImageWell. I usually drag and drop them because I have Finder open at the bottom of my screen.
  2. Enter a new height or width based on the orientation of the image. Since this is landscape, I choose 900px wide.
  3. Rename the file up at the top and select a location to save it to just below the image. I chose my blog folder on Dropbox. I’ll explain how to set those up in a bit.
  4. Sometimes with camera images, you need to rotate the image and re-save it, which is done on the More tab, and you can see Watermark is just to the left of that with watermark options.
  5. Every now and then, you’ll want to crop an image or adjust the brightness or contrast, right? Then click Edit at the bottom left for a new screen with those abilities. See the crop tool in the upper right? Click the ImageWell icon on the far left to return to the normal view.
  6. Edit screen

  7. Click the Send button to save the image to the location you have selected from the pull-down list (explained below).

Locations dialog boxIf you click Locations on the main screen, you can add all sorts of save-to spots for one-click saving to a folder, FTP, Flickr, ImageShack, or SmugMug, to name a few. While it can be handy to upload straight to FTP for certain blogging platforms, I choose not to for WordPress because it generates thumbnails when uploaded directly into a post, which also associates the files with the post for creating a gallery, as I’ve done with the four trashcan images in a row. You’ll notice that sometimes I create a folder just for a particular time of editing (p2-June is a folder in my blog folder for my vacation photos) because I can easily remove them with the minus button at any time the list gets too long to be easily functional. Click the plus button to create a new entry, select the location type on the right, and then the Location Properties area will take on the new format for the fields required for the location selected. If you selected Folder, click the little ellipses button to bring up a folder selector.

That’s all I can think of to get you started on the road to quicker, easier image re-sizing and saving on your Mac. If there is a better program out there for the money, or even more money, I haven’t seen it. I use ImageWell even when Photoshop Elements is already open because saving the image to one of my preset locations with an easy-access file name change field is faster than what I can do in Photoshop. Admittedly, cropping is faster in Photoshop, but if you’re combining a re-size, re-name, and a crop, go with ImageWell. You’ll be faster every time.